
Oh I've been cooking some. And then I've taken a week or two off. You know, LIFE. Here are some things we have enjoyed recently:
Chicken Spinach Pasta Bake:
Delicious! Easy kid friendly...not for the health conscious :) There is cheese, cheese, and a little more cheese in this. But, like I said, LIFE.

Recipe HERE
Shrimp and Avocado Salad with Miso Dressing:
Good fresh adult dinner. We didn't even attempt this one with the kids! Ha

Recipe HERE
Tomatillo Ranch Chicken:
Family friendly! Kids loved it, so good - we had it with rice and butter beans.

Recipe HERE

Poached Eggs and Spinach
This was an easy and delicious dinner that used up some of our generous chicken's many eggs. The kids actually ate it and, while they weren't exactly excited about the spinach and kind of picked through it, they couldn't help but get bits of spinach on each bite since the eggs were cooked in it. :) Made me smile seeing them stick those leafy greens in their mouths!
Ingredients:
butter
a LOT of spinach, {about two bags!} loosely chopped {I always chop spinach just because I do not enjoy long strands of it when cooked.}
1 large onion, chopped
4 minced garlic cloves
1.5 c vegetable stock
6 - 8 eggs
grated parmesean
Preheat oven to 350. In a large flat ovenproof skillet over medium heat, melt butter. Saute onion and garlic until translucent, about five minutes or so. Add spinach in batches {it won't all fit in the pan when fresh!}, stirring until wilted. Add vegetable stock and turn heat to low. Simmer until almost all the stock has evaporated, about 10-15 minutes. Season to taste {I didn't need a lot of seasoning because the vegetable stock had a lot of flavor}. Make wells in the spinach, for however many eggs you are using. Carefully crack eggs in each hole. Sprinkle parmesan on top. Place in oven for about 7 - 10 minutes, depending on how you like your eggs cooked {we like sunny side up-over easy so I didn't cook it for too long}.
Original recipe found here
I served it with a favorite go-to Tomato Mozzarella Tart recipe, below
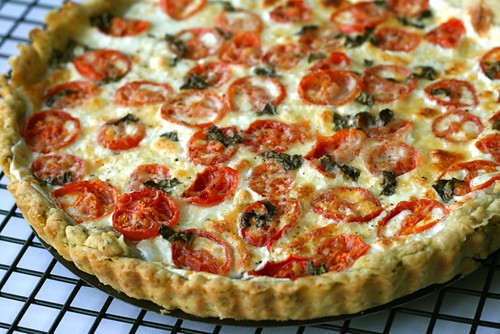
Tomato Mozzarella Tart
for the dough:
1/3 cup fresh basil leaves {I've also made it with dried basil but you have to be careful how much you put in there since dried basil is more concentrated}
1-2 cloves garlic
1-1/4 cups flour
1/2 t kosher salt
8 T unsalted butter, cut into 8-10 pieces
4-5 T cold water
for the filling:
8oz fresh mozzarella, sliced
ripe cherry/grape tomatoes {I've also used roma but prefer grape}
s&p
1-2 T minced fresh basil
To make dough: combine basil and garlic in a food processor. Process, scraping sides as needed until everything is finely minced. Add flour and salt, pulse to combine. Add butter and pulse again until mixture resembles pea-sized crumbles. Add 3 T water and pulse to incorporate. Add 1 more T of water and process for several seconds to see if dough forms a ball. If not, add another T of water and process until ball forms. Remove dough, and flatten into a 5 or so inch disc and wrap in plastic wrap. Refrigerate for at least 1 hour {I have skipped the refrigeration step before and it DID make a small difference. Not huge if you skip this step, but I would recommend refrigeration}.
When you are ready to bake tart, preheat oven to 425. Transfer dough to floured work surface and roll out to a 12 inch circle. Lay over 9 inch tart or pie pan and press into sides. Trim excess dough as needed and use it to reinforce the sides or as a snack {my kids and I snack on it :)}. Lay aluminum foil loosely over the tart dough and fill with baking beads if you have them {I do not}. Bake in oven for 10-12 minutes. Remove from oven and remove foil. Return empty shell to oven and bake for five minutes more. Remove from oven and lower temp to 375.
Layer bottom of pre baked tart shell with sliced mozzarella. Arrange tomato slices on top of cheese in a single layer. Season with salt and pepper and drizzle with olive oil. Top with parmesan and niched fresh basil.
Bake about 30 minutes, until dough is golden brown and cheese is bubbly and lightly browned in spots. If needed halfway through baking wick off any excess moisture on top with a paper towel/rag. Let tart sit for at least 5 minutes before slicing and serving.
original recipe found here
And last but not least, these cookies are just hard to beat:

Nestle Tollhouse original chocolate chip recipe found here, or on the back of your chocolate chips! :)

interior design at its best: http://www.inspiredinterior.com/
ReplyDeleteThat Tomatillo Ranch Chicken recipe sounds and looks yummy!
ReplyDelete